Pages
Showing posts with label Recipes. Show all posts
Tuesday, May 22, 2012
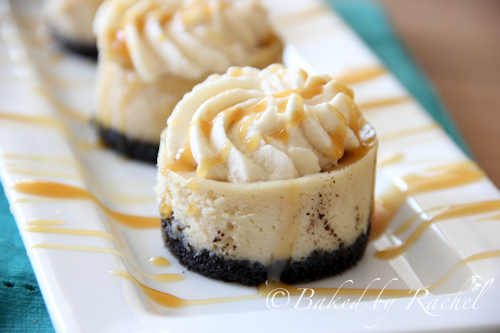
Mini Coffee Cheesecake with Caramel Whipped Cream
Recipe by: Baked by Rachel
Makes 8 mini cheesecakes Ingredients:
6 oreo cookies, original (not double stuffed)
2 1/4 tsp butter, melted
6oz. cream cheese, softened
1/3C sugar
1 tbsp coffee syrup
1 tbsp flour
1 egg 1C whipping cream
2 tsp caramel syrup, plus additional for drizzling
1/4C brown sugar
Preheat oven to 300 degrees.
In a food processor, pulse cookies until no large chunks remain. Melt butter, spoon 2 1/4 tsp into crushed cookies. Pulse to combine. Set aside. (Alternately cookies may be placed in a plastic bag and crushed with a rolling pin or meat tenderizer.)
In a medium bowl, beat cream cheese until smooth. Add sugar, coffee syrup and flour. Mix until well combined. Finally add egg, mix just until combined and no more. Grease 8 mini cheesecake cavities with nonstick cooking spray (such as Pam for baking). Divide crust ingredients evenly between greased cavities. Press down firmly to create a flat crust. (I use a flat bottom shot glass because it fits perfectly.) Carefully top off crust with cheesecake filling. Using a medium cookie scoop, roughly 2 1/2-3 scoops will fill each. Be sure to not overfill, these should be filled to 1/4″ from the top as they will puff up during the cooking process. Bake at 300 degrees for 15-18 minutes or the center is just slightly jiggly. Cool on a wire rack for 30-60 minutes. Transfer to the refrigerator for 2-4 hours or overnight. Carefully remove cheesecakes from the pan and removing discs from the bottom of each cheesecake. In a small-medium sized bowl add whipping cream, caramel syrup and brown sugar. Beat on high until very thick, approximately 4 minutes. Top off chilled cheesecakes with dollops of whipped cream. Or add whipped cream to a plastic bag fit with a pastry tip or snip the edge off and swirl whipped cream onto the tops of your cheesecakes. Drizzle with caramel sauce. Serve immediately.
Wednesday, January 25, 2012
Homemade Iced Circus Animal Cookies
Vanilla Sugar Animal Cookies with Royal Icing
About 3 dozen 2 1/2 inch cookies
1 2/3 cups all-purpose flour
1/2 teaspoon baking powder
1/4 teaspoon salt
1/2 cup softened unsalted butter
3/4 cup plus 2 tablespoons sugar
1 egg at room temperature, beaten
1 teaspoon vanilla extract
Royal icing (recipe follows) and colored sugars if decorating
1/2 teaspoon baking powder
1/4 teaspoon salt
1/2 cup softened unsalted butter
3/4 cup plus 2 tablespoons sugar
1 egg at room temperature, beaten
1 teaspoon vanilla extract
Royal icing (recipe follows) and colored sugars if decorating
1. Sift together flour, baking powder, and salt in a bowl and set aside.
2. In stand mixer, cream together the butter and sugar on medium speed for several minutes until light and fluffy.
3. With mixer on low speed, gradually add the egg and vanilla and mix until well combined. Add the flour mixture gradually. Mix until fully incorporated and the dough is smooth and uniform.
4. Divide dough into 2 pieces and flatten into 1/2 inch thick discs.
5. Wrap dough and refrigerate for 2 hours. At this point the dough can be double wrapped and frozen for up to 2 weeks.
6. When you are ready to bake the cookies, preheat oven to 325°F. Grease several cookie sheets or line them with parchment paper.
7. Place dough on a lightly floured surface and dust with more flour. Gently roll the dough 1/8 inch thick.
8. Using a cookie cutter, cut out cookies and place on sheets about 1 inch apart.
9. Bake for 14–16 minutes, rotating sheets halfway through, until edges are golden brown. Transfer cookies to wire racks with a metal spatula to cool completely.
10. Once cookies are cooled, decorate them with icing and colored sugars.
2. In stand mixer, cream together the butter and sugar on medium speed for several minutes until light and fluffy.
3. With mixer on low speed, gradually add the egg and vanilla and mix until well combined. Add the flour mixture gradually. Mix until fully incorporated and the dough is smooth and uniform.
4. Divide dough into 2 pieces and flatten into 1/2 inch thick discs.
5. Wrap dough and refrigerate for 2 hours. At this point the dough can be double wrapped and frozen for up to 2 weeks.
6. When you are ready to bake the cookies, preheat oven to 325°F. Grease several cookie sheets or line them with parchment paper.
7. Place dough on a lightly floured surface and dust with more flour. Gently roll the dough 1/8 inch thick.
8. Using a cookie cutter, cut out cookies and place on sheets about 1 inch apart.
9. Bake for 14–16 minutes, rotating sheets halfway through, until edges are golden brown. Transfer cookies to wire racks with a metal spatula to cool completely.
10. Once cookies are cooled, decorate them with icing and colored sugars.
Royal Icing
2 egg whites
1 tablespoon lemon juice
3 cups powdered sugar
Food coloring in desired colors
2 egg whites
1 tablespoon lemon juice
3 cups powdered sugar
Food coloring in desired colors
1. Using a mixer with the whisk attachment, combine all the ingredients and whisk for several minutes on high speed until the mixture is thick and shiny opaque white. It should have the consistency of glue. If it is too thin, add more powdered sugar by teaspoonfuls as needed. If it is too thick, add water by teaspoonfuls as needed.
2. Divide icing into bowls for coloring. Keep the bowls covered or the icing will dry and harden. Add food color to icing to achieve desired hues.
Tuesday, January 17, 2012
Homemade Artisan Bread Recipe

I have decided that I am now going to try and make my own bread each week. I am not very found of the bread options in the store and there is something great about making something yourself.. First, before I did this I needed to find a recipe that was both fast (I have a very busy schedule) and good at the same time. I came across this recipe at Make and Takes and decided to give it a try. This was by far the easiest recipe only taking me 1 hour total and it was delicious. 1 recipe produced three loaves of bread for us. Not only did it taste good but, it looked no joke just like the picture above. Since it turned out so great I thought I would share the recipe with all of you. Enjoy..
Recipe for Homemade Artisan Bread makes 3 loaves
- 3 cups lukewarm water
- 1 1/2 tablespoons granulated yeast (Note: I used rapid rise east cutting my time down)
- 1 1/2 tablespoons kosher or other course salt
- 6 1/2 cups unbleached all purpose flour
- cornmeal for pizza peel (optional)
1. In a very large bowl, add your flour, yeast, and salt.

2. Pour in your water and stir until combined, just a few minutes.
3. Cover your bowl with foil or greased plastic wrap for 2-5 hours. We left it for 5 hours and it turned out just fine, yay!
4. Divide your dough into 3 loaves with a knife. Cover each loaf with flour and form it into a ball.
5. Lay onto a baking sheet with a silicone baking mat or onto a pizza stone sprinkled with cornmeal. Let this dough rest for about 30 or so minutes.
6. With a sharp knife, slash the top of each loaf into 3 lines or a criss-cross pattern. This helps let out some steam in the dough. If you don’t slash your bread, the bread will most likely make it’s own tear somewhere during cooking.
7. Preheat your oven to 450 degrees and add a small pan filled with 1 cup of water on a lower rack for a water bath. Bake for 30-35 minutes.
8. Place your baked bread on a baking rack to cool.
Friday, January 13, 2012
Fun Sign's and Homemade Pop Tarts
Every Thursday my sister and I get together and come up with some fun and creative project that we can share with eveyone. The last two weeks we have been working on some signs. I had some wood around my house that was perfect for signs. My husband is a painter and so we have all the materials our little hearts could desire. SImply sand down the wood to get rid of any rough edges. Find two paint colors that you like. One should be a little darker than the other. Put your darker coat on first then the lighter.
I found some beautiful stencils at Michaels by Martha Stewart and got some paint as well. If you would like to make your sign looked distressed apply the paint liberally and then once it is dry, blow dry it on high heat. This will warp the paint. I think both of us our going to put our signs in our bedrooms. I am goign to make a headboard to match mine:)
The other project we did was make homemade pop tarts with the kids. Here is the recipes for these and the end results. p.s. while I was grocery shopping today my husband decided he wanted to make himself some:).
Homemade Cinnamon and Brown Sugar Pop Tarts
1 premade pie crust (or make your own)
Butter, softened
1/2 cup of brown sugar
1 1/4 tsp. ground cinnamon
1 egg, mixed well.
Preheat oven to 400 degrees. Line a baking sheet with a slipat mat.
Place the dough on top of the cutting board. Cut the dough into four squares. Roll the cut off strips of dough out and make one more square. Mix the cinnamon and sugar mixture until well combined. Spoon a bit of cinnamon mixture on top of the butter.
Fold the douhg in half and gently seal the edges with your fingers. Take a fork and crimp the edges of the pop tart closed.
Slice a little vent into the top of each pop tart. Brush the tops of each pop tart with the egg wash. Sprinkle each pop tart with some of the raw brown sugar and cinnamon mixture.
Place into the oven and bake for 15 minutes or until golden brown. Remove from the oven and cool on a baking rack. Serve warm.
Monday, January 9, 2012
caramilk brownies
I saw this delicious recipe on foodgawker and thought I would share it. I know that my friends and I are always looking for new desserts to bring to different functions. This one would make a great girl's craft night dessert.. If you have a recipe you love feel free to share it here or on our facebook page. We look forward to seeing what kinds of things our readers make:)
For the brownies:
- 1/2 cup margarine plus 2 tablespoons, divided
- 6 tablespoons cocoa
- 1 cup white sugar
- 2 eggs
- 1 teaspoon vanilla
- 3/4 cups all purpose flour
- 2 100 gram Caramilk bars, broken into their individual squares (more or less to taste)
For the topping:
- 20 Kraft caramels
- 1 tablespoon heavy cream
Grease a 9×9 baking pan. Preheat oven to 350°F.
In a saucepan, melt 1/2 cup margarine over medium-low heat. Add the cocoa and the additional 2 tablespoons of margarine and mix to combine. Remove from heat. Stir in the sugar. Stir in the eggs, one at a time. Stir in the vanilla. Stir in the flour, mixing until well combined.
Spread about 3/4 of the batter into your baking pan. Place the Caramilk squares in rows on top of the batter. (Don’t press them down, and try to space them somewhat evenly so each and every brownie gets a gooey bite.) Drizzle the remaining batter over the Caramilk squares. Don’t worry if the squares aren’t totally covered – you can use a spatula to gently spread the batter over top.
Bake for 25-30 minutes, or until cake tester comes out clean. Then allow to cool on a rack.
To make the topping: place the caramels in a small saucepan over medium-low heat, stirring almost constantly until completely melted and smooth. Remove from heat and stir in the heavy cream. Pour over the brownies and spread evenly with a spatula. Allow to cool before eating. (If you can.)
Recipe found at : Movita beaucoup
Subscribe to:
Posts (Atom)


