Pages

Monday, July 30, 2012

Life in the fast lane.

I know better than anyone how crazy life can get, between family, careers, extra activites, and more. We can sometimes have a hard time balancing everything. Luckily we live in a time where there are a lot of options found on the Internet. While I love my tablet, computer and smart phone, when it comes to organizing sometimes nothing beats a great list. I wanted to give you some links to some great websites and blogs that offer free home organizing printables. They offer everything from grocery lists to chore lists for the kids and If you prefer technology, they even offer popular apps. I hope this helps all the busy moms and women everywhere.


Tipnut.com

How Does She

Organized Home

homemakingorganized.com

Summer Fun Round Ups

     Well here we are half way through the summer and we are enjoying every second of it.  It's usually about this time when our kids start saying those two famous and dreaded words, "I'M BORED!"  So, I've decided to round up some lists of things to do with your kids to help get all of us through this second half of summer with some fun and sanity.  This list will include things here locally in the Southern Oregon area as well as things we can do with our kids right in our homes.  One thing that Medford and Central Point offers is free movies in the park on Friday and Saturday nights.  These are great FREE family activities and who doesn't love free?!  My husband and I, along with my sis and brother in law, took our kids recently to see The Adventures of Tin Tin.  The kids were able to bring along friends and the city even offers a free jump house, face painting, coloring, and craft while you wait for the movie to start.  Here are some pics of our family outing......
girls havin fun in the jumphouse

He's thinkin, "Moooommm I wanna jump"

guys hanging out before the movie

Girls relaxing 


In line for face painting and crafts


     I will be posting activities for each week on Fridays to help with the following week.  If anyone has any other ideas, events, etc, please feel free to post so we can get the most out of our summer.
                                                                                               Blessings, Jen

Saturday, July 28, 2012

Lemon Cranberry Scones

Hello Everyone,
The last couple of weeks have been very busy and we have had a down computer:( but, we are back up and still a little busy. Last week my husband and I went and spent the day in Bandon, Oregon (I love the coast!) but, before we left I wanted to make some scones and some yummy items for our road trip. O this date I had never made scones before and I really wanted to try them out. I have to say, I loved them and this recipe was so yummy.....Here is the recipe and pictures of the scones but, tell me what is your favorite scone recipe? please feel free to leave us a comment with any tips, recipes or links you may have regarding a great recipe.


Lemon Cranberry SconesGina's Weight Watcher Recipes Servings: 10 • Serving Size: 1 scone • Points: 4 pts • Points+: 5 pts
Calories: 192.5 • Fat: 4.7 g • Protein: 4.3 g • Carb: 33.9 g • Fiber: 2.1 g  
Basic Scone recipe modified from Cooking Light

  • 2 tbsp sugar
  • 2 tbsp fresh lemon juice, divided
  • 1/2 cup low fat buttermilk (PS I made mine)
  • 1/4 cup sugar
  • 1 tbsp lemon zest
  • 2 tsp vanilla extract
  • 1 large egg
  • 2 cups Ultra grain flour (or 1 cup white, 1 cup whole wheat)
  • 1 tbsp baking powder
  • 1/2 tsp salt
  • 3 tbsp chilled butter (must be cold) cut into small pieces
  • 3/4 cup dried sweet cranberries or cherries

Position rack in top third of oven; Preheat oven to 375°.  Line baking sheet with parchment paper. Make glaze by combining 2 tbsp sugar and 1 tbsp lemon juice.

Combine buttermilk, remaining lemon juice, sugar, lemon zest, vanilla, and egg in a medium bowl, stirring with a whisk.

Combine flour, baking powder, salt, in a large bowl, stirring with a whisk. Cut in chilled butter with a pastry blender, or you could use 2 knives, until the mixture resembles coarse meal. Gently fold in cranberries or cherries. Add buttermilk mixture, stirring just until moist. (dough will be sticky)

Place dough onto a floured surface and knead lightly four times with floured hands. Form dough into an 8-inch circle onto baking sheet, about 3/4" thick. Using a knife, cut dough into 10 wedges (do not cut all the way through). Brush lemon glaze over dough. Bake until golden, about 18-20 minutes, or until a tester comes out clean.


Sneak Peak to the "Everything Heart & Girly Party"

The last week has been super busy as will this up coming week, alot of my extra time has been prep for my nieces birthday party. I thought I would post some sneak peaks to the party.


The chocolates we made to go in the gift bags.

The backdrop to the dessert table

A chair we repurposed for a photo booth along with a bunch of heart props

The invites I created with images from K-See Images

The giant suckers
The gift bags
More pictures and details of the party to follow..Stay tuned!

Friday, July 13, 2012

Healthy Banana Bread


Last week after returning from vacation, I had alot of bananas that I needed to use. I came across this healthy so moist and yummy bread recipe at Living a Whole Life. This recipe was so good that I am going to make it again today.


Recipe:

1 cup all purpose flour
1 cup whole wheat flour
1/2 cup brown sugar ( I used honey instead)
1 tsp baking powder
1 tsp baking soda
1/2 tsp salt
1/2 tsp cinnamon
1 egg
1 1/2 cups mashed bananas (4-5 Bananas)

1. Mash the bananas and beat the egg. Now mix together with sugar (or Honey), salt and cinnamon.
2. Take a large bowl and mix in flour, baking powder, baking soda and the wet ingredients. Stir together.
3. Bake at 350 degrees for 50 minutes or until your knife comes out clean.

ENJOY!!


Tuesday, July 10, 2012

No Bake Energy Bites

Here is a great recipe from smashed peas and carrots. Theses little balls of yumminess are full of protein and make for a great snack, oh did I mention they are super easy.


Recipe:

1 cup oatmeal
1/2 cup peanut butter or other nut butter
1/3 cup honey
1 cup coconut flakes (optional)
1/2 cup flaxseed (recipe calls for ground but, I used whole seeds.)
1/2 cup dark chocolate chips
1 tsp vanilla

Mix everything above in a medium bowl until thoroughly incorporated. Let chill in the refrigerator for half an hour. Once chilled, roll into balls and enjoy! Store in an airtight container and keep refrigerated for up to 1 week.

Thursday, June 21, 2012

The Importance of the Family Table

In today's society families are always on the go. I know are weeks are pretty packed but, with all the business there is still one things families should do and that is to make time to have a meal together. This is very important to not only families but, couples without children as well. This is a time of connection, a time to talk about the days activities. It is where communication happens. I came across this free printable from http://declutteryourhomes.blogspot.co.uk/. I love this idea. print out the printable question cards and put them in a jar. Each person pulls a card and answers it. If you are just starting off and maybe find it a little awkward this is a great way to break the silence. Take the time to eat together at a table and talk. Precious memories are made during this time and we all know that life goes by fast.

Pinned Image

Monday, June 18, 2012

5 Ingredient Peanut Butter Granola Bars


This last weekend I was in the mood to bake! I made cookies and homemade granola bars so, I thought I would share the Granola Bar recipe with you..

Recipe from savoring the Thyme

Ingredients

4 cups rolled oats
2 tablespoons chia seeds (I used Flaxseed)
1/2 cup unsalted peanuts (I used a mix)
3/4 cup natural peanut butter, melted
1/2 cup honey

add ins:

chocolate chips
wheat germ
flaxseed
dried fruit (I used organic raisins)
other nuts
coconut

Preheat oven to 350 Degrees

In a large bowl, combine oats, chia seeds and peanuts. Add honey and mix to combine. Add melted peanut butter and mix until moistened. This works as a perfect, a simple granola bar, but you can also throw in any add-ins at this time. Fold them into the dough. If the dough is still too dry (this can depend on your ingredients) add more peanut butter or honey, 1 tablespoon at a time until moistened.


Press Dough into a greased 9x13 baking dish. Bake for 25 minutes.


Girls Rock Party

     Well,  I would say the Girls Rock Party was a huge success!  We all had a ton of fun and our hard work was well worth it.  I just wanted to take a moment to post some pics of the fun that we had.   I had previously posted the Girls Rock party invitations on the blog and wanted to make sure you got to see the rest of it.  The day started with a trip to Jacksonville to ride the Trolley, pizza, facials, Karaoke, and then root beer floats.  Soooo, here it is......
Sav Rocks Cupcake tower , popcorn bowl, yummy cake pops, and
a Girls Rock banner

Karaoke

Facials

Our trip to Jacksonville

Enjoying the Trolley


Blessings, Jen


Saturday, June 16, 2012

Puffy Vanilla & Butterscotch Cookies

Recipe adapted from Six Sister Stuff


This recipe turned out amazing!! Here are the results of the cookies I made above you could add any chips you like.

Ingredients:
1/2 cup Crisco
1/2 cup white sugar
1/4 cup light brown sugar, packed
1 large egg
1 Tablespoon water
2 teaspoons vanilla extract
pinch of salt
1/2 teaspoon baking soda
1 1/2 cups all-purpose flour
3/4 cup butterscotch chips ( I used the whole bag)

Directions:
Preheat oven to 375 F and line two sheets with parchment paper (I use wax paper). In a large bowl, beat together Crisco, sugars, egg, water and vanilla, until batter is creamy. Add the salt, baking soda and flour and mix until just combined. Fold in the butterscotch chips by hand. Cover and refrigerate for 30 minutes.
Roll dough into 1 inch balls and place on cookie sheet. Bake for 8-10 minutes or until just slightly browned. Remove cookies from the oven and let sit for 5 minutes before removing them from the baking sheet.

ENJOY!


Friday, June 15, 2012

Free Father's Day printables

Are you planning on throwing a party for the Father in your life or simply a family BBQ. Then here are some great websites and blogs where you can find free printables, Enjoy.


Tip Junkie Offers some really cute printables.


Free Father's Day Printables


Here is one found on  Creative Party Ideas by Shindig parties to go, that has the cutest tie theme and if you look online they even offer a tie napkin fold and a shirt napkin fold. So Cute!!!!


This one is my Favorite what child does not think there Dad is a super hero. I still think that my Dad is. I also saw the cutest bags and cards that say "Not all Dads wear capes" at Walmart. You can find this at Catch My Party where they also offer a mustache theme and more.

Tuesday, June 12, 2012

Father's Day Gift Ideas

Father's Day is right around the corner so, I thought this week I would share on some ideas to make your Dad or your husbands day an extra great one. What man does not love a new gadget, here are some ideas for you to look for while you are shopping for the Dad in your life. The picture below is of our Dad and we are very lucky to have such a loving Father. We are both Daddy's girls:)


Saturday, June 9, 2012

Final Ice Cream Recipe - Mocha Chip Gelato


Todays recipe comes from Batter and Beat and it looks yummy!!

Mocha Chip GelatoAdapted from Gourmet, January 2001
  • 1-3/4 cups 2% milk
  • 2 tablespoons cornstarch
  • 1/3 cup sugar
  • 2 teaspoons unsweetened cocoa powder (not Dutch-processed)
  • 1 tablespoon instant-coffee granules
  • 1 teaspoon vanilla
  • 1 oz. fine-quality bittersweet chocolate, finely chopped
  • 1 tablespoon sliced almonds, toasted and cooled
  • pinch of salt

In a small bowl, stir together 1/4 cup milk and cornstarch.

Whisk together sugar, cocoa, and remaining 1-1/2 cups milk in a small heavy saucepan and bring to a boil over moderate heat, stirring. Whisk in coffee granules. Stir cornstarch mixture again and whisk into coffee mixture. Return to a boil, whisking, then remove from heat.

Add vanilla, a pinch of salt, and half of chocolate to saucepan, stirring.

Set saucepan in a large bowl of ice water to cool, whisking frequently.

Freeze chocolate mixture in ice-cream maker. When nearly frozen, add remaining chocolate and churn until blended. Serve gelato sprinkled with almonds.

 Makes 4 servings.

Thursday, June 7, 2012

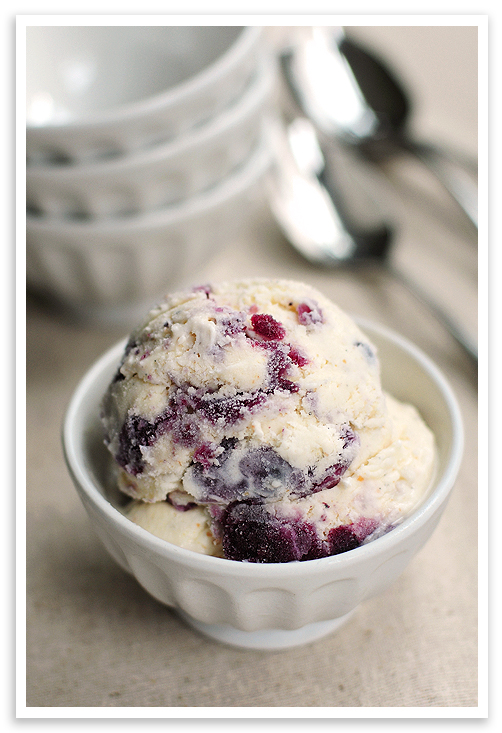
Ice Cream Recipe #4 "Blueberry Pie Ice Cream"

I love Blueberries so when I saw this recipe I new it was a must! This recipe is from She Wears Many Hats. This is a great Blog with beautiful pictures, recipes and more..


Blueberry Pie Ice Cream Recipe
 
Prep Time: 10 minutes
Cook Time: 5 minutes
Total Time: 45 minutes
Makes about 6 servings.
Adapted from David Lebovitz.
Ingredients
  • 2 cups heavy cream
  • 1 cup whole milk
  • 3/4 cup sugar
  • 1/8 teaspoon salt
  • 1 vanilla bean
  • 1 teaspoon vanilla extract
  • 3 graham cracker, pulverized (totally)
  • 3/4 cup blueberry pie filling (or desired pie filling)
Instructions
  1. In a saucepan heat 1 cup of heavy cream, sugar, and salt. Cut the vanilla bean in half and scrape seeds into mixture along with the vanilla bean pod. Stir until sugar is dissolved. Remove from heat and remove bean pod.
  2. Add 1 cup heavy cream, 1 cup milk, vanilla extract, and crushed graham cracker.
  3. Refrigerate mixture until thoroughly cooled.
  4. Add chilled mixture to ice cream maker and churn according to directions.
  5. Once churned, gently stir in pie filling and serve right away, or layer ice cream and pie filling in container, and freeze until desired hardness.
  6. Makes a little over a quart. (4 1/2 cups to be exact.)

Wednesday, June 6, 2012

"Girls Rock" Party invitations


     My very good friend and I are getting ready to throw a Girls Rock birthday party for her daughters 10th Birthday.  I love animal prints so I am pretty excited about this one!  I thought I'd post a sneak peek of the theme we are going to be doing.  We made these invitations out of scrapbook paper and used the pink on the back to write all of the birthday party details on.  All of the decorations will be based around these.  I cannot wait for this party!  We are going to be having a sleepover with several girls, going on a trolley ride, karaoke, facials, doing nails, a photo booth, and lots of food!  I will be posting more pics after the party so keep your eye out! 
                                                                       ~ Jen 

Tuesday, June 5, 2012

Ice Cream Day - Chocolate Sea Salt Cookie Sandwhiches with Salted Caramel Ice Cream


Today's recipe comes from Food + words Enjoy:)


Yield: 6 ice cream sandwiches
the cookie recipe will give you enough to make six ice cream sandwiches, while the ice cream recipe will leave you with plenty of leftover deliciousness in the freezer! the cookie recipe can easily be doubled.
did i mention that these cookies are delicious enough to eat on their own? you might want to make double the recipe, just so you can snack on them while assembling the ice cream sandwiches!

Ingredients:

for the cookies
1/2 stick unsalted butter
4 ounces good dark chocolate (you can use chocolate chips too!)
1/2 cup all-purpose flour
1/4 cup dutch process cocoa powder
1/4 teaspoon baking soda
1/4 teaspoon kosher salt
3/4 cup granulated sugar
1 large egg
1/2 teaspoon instant espresso powder
large-flake sea salt for topping (i love maldon)
for the ice cream
1 cup salted caramel sauce (see recipe here)
2 cups whole milk (i used fat free half and half because it's all i had, and it worked beautifully. use what you have!)
5 egg yolks
1 cup heavy whipping cream

Directions:

for the cookies
preheat oven to 325 degrees F.
line a baking sheet with parchment paper, and set aside.
in a microwave-safe bowl, combine the chocolate and butter. microwave in 20 second increments until chocolate and butter are melted, and stir to combine. set aside.
sift together flour, cocoa powder, baking soda and salt. set aside.
whisk together the sugar and egg, and whisk in the melted chocolate mixture. whisk until combined.
add the flour mixture to the melted chocolate mixture. using a spatula, fold until combined. dough will be very wet.
i used a #60 cookie scoop, which holds 2 teaspoons-worth of dough and yields cookies which will be 2 inches in diameter. feel free to use a teaspoon to make the same sized cookies, or make smaller cookies.
using a cookie scoop or portioner, place cookie dough scoops two inches apart on baking sheet. sprinkle tops of cookies with large-flake sea salt.
bake cookies for 13-15 minutes, or until tops are crackled and cookies have spread out a bit.
allow to cool completely. set aside.
for the ice cream
pour caramel into a medium-sized saucepan, and heat over medium heat until warm.
add milk to caramel, and whisk until caramel is dissolved and incorporated.
in a separate bowl, whisk egg yolks to combine.
slowly drizzle about 1/2 cup of caramel milk mixture into the egg yolks, whisking continuously to temper the yolks.
scrape tempered egg yolks into the saucepan with the remaining caramel milk mixture. over medium heat, using a wooden spoon or spatula, stir the pan continuously.
the mixture will begin to thicken and become a custard, and this can take anywhere from 5-15 minutes.
the custard is ready when it is thick enough to coat the back of the spoon.
strain the custard through a sieve or cheesecloth into a clean bowl. add the heavy cream, and stir to combine.
transfer custard to an airtight container, and refrigerate for at least two hours, overnight if possible.
when ready to make ice cream, churn in your ice cream maker according to the manufacturer's instructions, about 25-30 minutes for soft-serve consistency.
transfer to airtight container for at least two hours to firm up.
assembling the ice cream sandwiches
using the #60 cookie scoop or a rounded teaspoon, deposit a small amount of ice cream on the underside of on cookie. spread out a bit using a small spatula or butter knife. top with another cookie.
once all ice cream sandwiches are assembled, return to the freezer for at least an hour to firm up.
the ice cream sandwiches will keep in an airtight container in the freezer for up to two months.
cookie recipe adapted from martha stewart
ice cream recipe adapted from david lebovitz

chocolate sea salt cookie & salted caramel ice cream sandwiches

Monday, June 4, 2012

Red, White, & Blue

     Well, I am getting pretty excited for a awesome celebration exactly one month from today!  Yep, the Fourth of July!!!!  I absolutely love the Fourth of July and all that comes with it.  We are celebrating our country and the freedom we have.  We really do live in a blessed country.  Sometimes I think that we forget that even some of our roughest times don't compare to what others live like and experience daily.  I always love all of the Red, White, and Blue decorations that begin to come out at this time of year.  I love all of the activities like the beautiful fireworks we get to see and all of the wonderful memories we can make with our families.  Our family always adorns our red, white, and blue attire so this year the girls and I thought we'd do something a little different.  Since the girls both learned how to make their own tutus, we thought we'd go ahead and make some for the fourth with matching headbands.  What little girl doesn't love to be dressed in a tutu and feel like a princess?  Both of my girls are very excited to wear them this year.  Here is a pic of how they turned out. 
                                                                             Blessings, Jen
Kierra with her tutu

We covered a headband with fabric and made tulle flowers/


Sunday, June 3, 2012

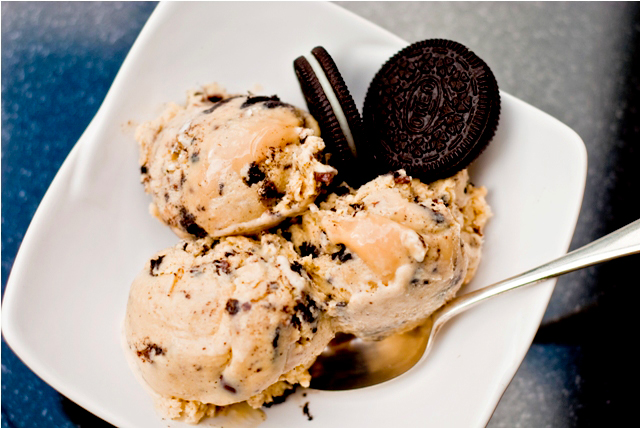
Jacked up Cookies and Cream Ice Cream


Recipe by : Guilty Kitchen


Cookies and Cream Ice Cream
Servings: 10-12 small bowls
Prep Time: 1 hour
Cooking Time: 10-20 minutes
Freezing Time: Overnight


 For the Custard Base:
2 1/2 cups heavy cream
1/2 cup half and half
1/2 cup sour cream
 3/4 cup
2% or whole milk

note on the dairy: You could makeahead and use any combination of dairy creams and milks that you like, but try to only play with the 2 1/4 cups on top of the 2 cups of heavy cream. If you take away too much of the heavy cream, your ice cream texture will suffer, and you will be left with more of an ice milk with loads of ice crystals.

 Good combinations would be:
 3 cups heavy cream
1/2 cup sour cream
 3/4 cup milk
OR
 2 cups heavy cream
 1 cup half and half
1/2 cups sour cream
3/4 cup milk
OR
2 cups heavy cream
 1 1/2 cups half and half
3/4 cup milk
etc.

7 egg yolks
2/3 cup brown sugar, packed
1 vanilla bean
 1 tsp vanilla extract
 dash salt
1 oz whiskey, bourbon, vodka or other alcohol (optional, best used by those without an ice cream maker)

1. In small bowl, whisk egg yolks with sugar and salt. Set aside.
2. In a medium sized saucepan, pour your dairy (heavy cream, half and half, sour cream and milk).
3. Split vanilla bean vertically, scrape out seeds into saucepan, toss in pods and set to medium heat.
4. Once cream begins to simmer, cover and remove from heat. Allow to steep for one hour.
5. Remove pods from cream and reheat to steaming. Gradually pour a thin stream of cream mix into egg yolk/sugar mix, whisking constantly.
6. Using a rubber scraper, scrape the cream/egg mix back into the saucepan. Cook over low heat until thickened. (Use the wooden spoon method here: when back of spoon is coated in custard, run a finger down the center. If the custard runs back together it’s not thick enough yet, if it remains separated, it’s ready.)
7. Strain into a bowl and either set that into an ice bath, continuously stirring until custard has cooled or set in fridge, stirring every 20 minutes or so until cooled.
8. When cooled, stir in vanilla extract and alcohol (if using). Cover and leave in refrigerator overnight.
9. For those with no ice cream maker: Place container (preferably metal with lid) in freezer. For first two hours, stir vigorously every 30 minutes. After that stir every hour or so until completely frozen. When almost completely set, stir in mix ins (recipe follows).
For those with an ice cream maker: Follow manufacturer’s instructions for freezing. When almost completely set, stir in mix ins (recipe follows).

For Cookies:
20 Oreo Cookies
6oz good quality chocolate (dark or milk)
1. Over a double boiler, melt chocolate.
2. Dip cookies in to coat both sides and lay onto wax paper to set.
3. When completely set, store in an airtight container in fridge until needed.
4. Chop into desired size right before using.

For Dulce de Leche Swirl:
adapted from David Lebovitz
1 300ml can sweetened condensed milk
3/4 oz whiskey, bourbon or vodka (optional, for those with no ice cream maker)
1. In a small glass dish (pyrex, corningware, pie plate, etc.) pour the can of sweetened condensed milk. Sprinkle with 1/4 tsp of sea salt and stir and cover tightly with aluminum foil.
2. Set the small dish inside a larger one that is the same depth or deeper.
3. Fill the larger dish with water right up to within 3/4″ of the top of the smaller dish.
4. Set into a 425°F oven and cook for 1 1/2 to 2 hours depending on the shallowness of the dish you used. I used a small corningware ramekin and it took 2 hours for mine to be perfect. Begin checking after 1 hour and continue to check until done.
5. Refill the water as it’s cooking if it gets too low.
6. When cool, add the alcohol (if using) and whisk the dulce de leche until smooth.

Friday, June 1, 2012

Blueberry Brown Butter Mini Pies

Blueberry Brown Butter Tarts

recipe from Dessert First Girl

I made mine in a cupcake pan instead of a tart pan. Here are my results..


Crust

  • 2 cups (250 g) all purpose flour
  • 1 teaspoon salt
  • 1 tablespoon sugar
  • 1 cup (225 g) unsalted butter, very cold, cut into 1-in pieces
  • 1/2 cup (120 ml) ice water
  • 1 teaspoon lemon juice

Filling

  • 2 large eggs
  • 1/2 cup (100 g) sugar
  • 1/2 teaspoon vanilla bean paste
  • 1/2 teaspoon salt
  • 1/4 cup (30 g) all purpose flour
  • 1/2 cup (115 g) unsalted butter
  • 1 pint (340 g) blueberries

For the crust:

  • Combine flour, salt, sugar, and butter in a food processor and pulse until mixture resembles small peas.
  • Combine lemon juice and water together. Add a little at a time to the food processor and pulse to combine. Stop when the dough begins to come together - don't let it form into a solid ball, but if you press the dough together it should hold and not fall apart into pieces. You may not need all the - I used about half.
  • Turn out dough and divide into two pieces, one twice as big as the other. Wrap each piece in plastic wrap and chill in refrigerator for at least half an hour until firm.
  • Preheat oven to 350 degrees F. Take out larger piece of dough and roll out to about 1/4" thick. Cut out six 6-inch circles and line six 4-inch by 2-inch tall fluted tart tins. Dock bottom of dough (prick a few times with a fork) and refrigerate for at least 20 minutes.
  • Take out the other piece of dough and roll out to about 24 inches long and 1/8" thick. Run a lattice cutter along the length of the dough. Carefully spread the lattice apart - if it's too soft, you may need to refrigerate the dough again to let it firm up a bit, but don't let it harden too much or it will be too stiff to pull apart. If you don't have a lattice cutter, you can always cut strips of dough and layer them over the top of the tart the old-fashioned way. Transfer lattice to a parchment lined sheet pan and refrigerate.
  • Remove tart tins from refrigerator and line each one with some parchment paper. Fill with pie weights.
  • Bake crusts for about 15 minutes. Remove and set aside. Leave the oven on.

For the filling:

  • Combine eggs, sugar, vanilla, and salt in a medium bowl and whisk together.
  • Sift flour over the mixture and carefully fold in.
  • Place butter in a medium saucepan and melt over medium-high heat until melted. Continue cooking until butter has browned. Remove from heat and let cool slightly.
  • Pour browned butter into egg mixture and whisk to combine.
  • Divide blueberries among the tart tins. Pour the butter mixture over the berries until they are just covered.
  • Remove lattice from refrigerator and cut into six pieces, each large enough to cover the top of the tart. Place each piece over the tart and press down the edges onto the crust.
  • Bake tarts for 25 to minutes, until the top crust is browned and filling is bubbly.


Thursday, May 31, 2012

Chocolate Gelato

With the weather getting warm, now is the time for some great Gelato and ice cream recipes. For the next couple of weeks I will be posting delicious Gelato and ice cream recipes you can make at home for yourself or family. This recipe is from The Italian Dish.


Ingredients:
 1 quart whole milk 1 tablespoon plus
1-1/2 teaspoons cornstarch
1/2 cup light corn syrup
1/3 cup sugar
1/2 teaspoon kosher salt
8 ounces bittersweet chocolate (about 70 percent cocoa)
1 teaspoon vanilla extract

Instructions:
 Place 2 tablespoons of the milk in a small bowl. Whisk in the cornstarch to make a slurry and set aside. In a pot, add the remaining milk and bring to a boil over medium heat. Whisk in the slurry, corn syrup, sugar and salt. Return the mixture to a boil and whisk in the chocolate until completely smooth. Transfer into a bowl and let cool to room temperature. Once cooled, stir in the vanilla extract. Cover and refrigerate for at least 3 hours or preferably overnight to make sure it is completely chilled. Whisk the base and then pour it into your ice cream maker and churn. The gelato should be the consistency of soft-serve ice cream. You don't need to churn it as long as you do ice cream -you want it to just be a custard sort of consistency, not completely frozen. Store in a chilled container in the freezer, with plastic wrap pressed onto the top. (After the gelato has been in the freezer for a day, take it out about 10 minutes before ready to serve to let it soften up).

Cute and Easy Dress with Headband

     I just wanted to do a quick post and show you what I have been working on.  I have been seeing these dresses and I am not exactly sure what they are called but I think that some people refer to them as pillowcase dresses.  I found some great tutorials online for these and I didn't even need to use a pattern.  The dress and headband cost me a total of $4.50! I love that! I made the dress just right so that both my girls can wear it.  Here is the finished product!  There are so many great fabric designs out there to get creative with.  I will definitely be making more of these in the future. Enjoy!